 While taking macro shots you might think of how far… or – better say – how close can you get to the object and still be able to get good picture quality. If your knowledge stopped on high-school optics knowledge level you are probably thinking there are no limitations. In a perfect world it would be true… or close to the truth.
Let there be light…
 Unfortunately there are even some basic rules that makes macro photography a tough job for your photo equipment. The first thing that comes to my mind is light… in macro there’s always not enough of it.
Example: your whole photo scene (using 50 mm lens) projects 1200 lumens of light to your image sensor (if it’s a digital camera) through the lens. Your scene is 40 cm wide and 30 cm in height. Basic math will tell you that this leads to 1200 lumens per (0,4 * 0,3) square meter, so ~ 10.000 lux (lux – lumen per square meter). Now… let’s get closer to our object. The whole scene is now 4 * 3 cm rectangle and we still have 10.000 lux. Once again – basic math and (0,04 * 0,03) m² * 10.000 lx = 12 lm (lumens). Your image sensor got 100 times less light than before… and we’re not even close to a 1 mm barrier.
What’s even worse – getting closer to your object usually means that you will block some part of the sunlight with your lens or macro equipment. Not enough for you? The closer you get the more shallow the depth of field become which means you will need a lower f-number (f/36) and if you use reverse mount macro technique you will loose your light twice (for each objective lens).
Nobody’s perfect
 So, you decided to spend some money on extra light sources, high-end tripod, camera body with ultra-low-noise ISO 3200 mode and a f/128 top-shelf lens just to make sure there will be enough light and DOF (depth of field) when you take shots of insects’ eyes. You will miss your Bentley… but what the hell – we do love macro photography that much.
While on a shopping spree you forgot that even the most expensive photo equipment obey the laws of physics. To get a satisfying DOF you’ve set f/64 and mounted your camera on a tripod just to make sure that a 30 second exposure on ISO 3200 will not get the image blurred. Right then… there’s a big disappointment – the image is not as sharp as you wanted to and (what’s even more disappointing) the colors aren’t right. Due to aberrations (both, chromatic and optical) you might think there’s something wrong with your equipment but it’s just fine. So… you (or better to say – your macro setup) have just hit optical limitations. The bigger the magnification the more demanding it is for the hardware you have and there’s nothing you can do about that. There’s a reason why optical microscopes don’t go beyond some magnification levels.
The test
Here’s my little test which will show you some macro setups. The object on the pictures is a 1 grosz (1/100 of a 1 PLN; 15,5 mm in diameter) coin glued to a cassette. The macro techniques used in the test are:
- macro objective lens
- macro close-up lenses
- macro converters
- extension tube
- microscope adapter
Some of you might think “a flat coin? It won’t show the DOF problem”. Believe me – it will. At that levels of magnification you can measure your depth of field in micrometers. All macro pictures were shot at ISO 100 with my Sony A200. The setups were shot with Nokia N8 phone.
Setup #1 – Sony kit lens at 70 mm focal length
This is a reference picture taken with my cheep zoom lens at it’s max. This means f/6.3 (not a f/5.6 for better sharpness), 70 mm and 1/4 of a second.


Setup #2 – 100-300 mm Vivitar lens in macro-mode
This picture was made using “close-focus” option in my Vivitar tele. As you can see it’s f/5 at 100 mm and 1/4 s shutter speed. Not much of a close-up but it’s better than nothing.


Setup #3 – 70 mm Sony kit lens with +10 diopter close-up lens
You can easily extend your macro possibilities using close-up lenses. The one on the picture is +10 diopter lens. Close-up lenses are cheap, easy to use but poor quality equipment. Taken with f/8 over 1 second.


Setup #4 – 70 mm Sony kit lens with two +10 diopter close-up lenses
You can combine two +10 diopter lenses to achieve +20 diopter lens effect. Taken with f/8 over 2.5 seconds.


Setup #5 – 70 mm Sony kit lens with MSN-202 macro converter
Macro converters are nothing more than groups of lenses put into one piece of hardware. They are more expensive than traditional close-up lenses but gives great image quality. Pictures taken with f/5.6, 2.5 seconds and f/11, 4 seconds. On the first exposition you can see how shallow is the depth of field.


Setup #6 – 70 mm Sony kit lens with MSN-505 macro converter
Same as above, but a model with higher magnification. f/13 and 8 seconds exposure.


Setup #7 – Vivitar 100-300 at 100 mm with MSN-202 macro converter
Thanks to snap-on technology on both Raynox MSN-202 and MSN-505 they can be mounted on wide variety of objectives. These were shot with f/5 and f/22 and exposed for 1/40 and 0,6 of a second respectively.


Setup #8 – Vivitar 100-300 at 100 mm with MSN-505 macro converter
Same as above, but with Raynox MSN-505 macro converter. f/5 and f/22 with 1/40 and 0,6 of a second.


Setup #9 – Vivitar 100-300 at 300 mm with MSN-202 macro converter
What is great about this Vivitar lens is it can go from 100 to 300 mm with a constant f/5. In macro… it’s useless. At 300 mm and f/5 the DOF is so shallow it’s hard to take a picture in focus. Here’s a photo of f/22 and 0.6 second exposition.


Setup #10 – Vivitar 100-300 at 300 mm with MSN-505 macro converter
Setup #9 was quite blurry… how far can this go? Let’s find out. f/5 and f/22 exposed for 1/10 and 0,6 of a second. As you can see the quality is pretty degraded. Colors aren’t right.


Setup #11 – Vivitar 100-300 at 300 mm with MSN-505 macro converter and an extension tube
“You’ve got to be kidding me…”. No, that’s true – it’s a custom extension tube made from toilet paper tube. It’s more than enough for our experiment as it blocks light and move our lens away from the camera body. This shot was taken with f/22 and 2 second exposure.
 As you can see the quality is awful and the DOF is so shallow that the edges of the shot are out of focus. It took me about a minute to take this shot because you have to position your camera with about 1 mm precision.
But can we go further? Is this the limit of optical macro photography? Thankfully no. Both Vivitar and Sony kit was not made for macro ultra-close-up photography. What is – you might ask. The answer is…
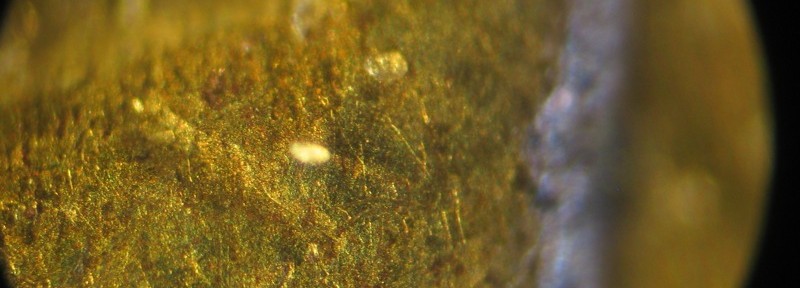
Setup #12 – Canon A75 and a microscope
Canon A75 and A510 are two brilliant digital cameras that can be bought for less than $35. They have great optics (with 4x optical zoom) and the best 3.2 MPix image sensor I’ve ever seen in a digital camera. What’s even better – it have manual focus for macro. What’s best about it is the possibility to attach an extension filter mount to it. This gives you the great possibility to connect your $35 camera with $150 Raynox MSN-505 and take astonishing quality macro photos for less than a price of DSLR.
But why use macro converter lens? Let’s connect it with a microscope and see what will happen. Those two pictures were taken with 5x and 15x ocular and a 20x objective (I have a 40x objective but don’t have a light source bright enough to take a picture; the objective was almost touching the coin). No cropping was made hence the vignetting.
 The second picture was enhanced (histogram correction). As you can see the quality of the first one is pretty good and the magnification is huge.
Final comparison
To show you how much we can achieve using macro techniques I decided to compare three pictures from the test. Those are showing the same coin that is 15,5 mm in diameter.