
I have recently received an email from Hungary with questions about compact camera macro shots with Raynox MSN-505. We have the same gear (Canon A75) and I already had some experience with using it for macro shots so… I was a perfect person to be asked that question ;)
First of all, there are some basic limitations connected with compact cameras. We can’t use macro objectives for the obvious reason. It’s also very hard to perform extension-tubes-macro as it will work only on some cameras (tried on my A75 with a success) and on 99% cases it will permanently damage you camera making it useless for anything else. Luckily I bought two A75 and the second one is still working.
 Ok, why Canon A75? Because it’s a piece of a legendary A-series with two flag twin camera models: A75 (Compact Flash and 4*AA batteries) and A510 (SD and 2*AA). Both have great 3.2 megapixel matrix and a top-shelf optics from Canon. What makes them perfect for macro shots are manual focus and a special mount for adapter tube which can be used for filter, lenses or even the reverse mount macro. If you’re starting with macro photography and don’t want to spend too much on the equipment the A75/A510 is a perfect choice. The camera itself shouldn’t cost you more than 100 PLN (~30 USD as for today) and 10 PLN (~3 USD) for every extra adapter (52 mm adapter tube, 52-55 mm adapter, 52-55 reverse mount adapter).
I have decided to take pictures of the paper you see under the camera on the next picture. They make quite a good set because of high contrast (black letters on white paper), high level of details (why? how? you’ll see later on) and some straight lines to check aberrations. Here’s the complete set. We will focus only on a small part of it.

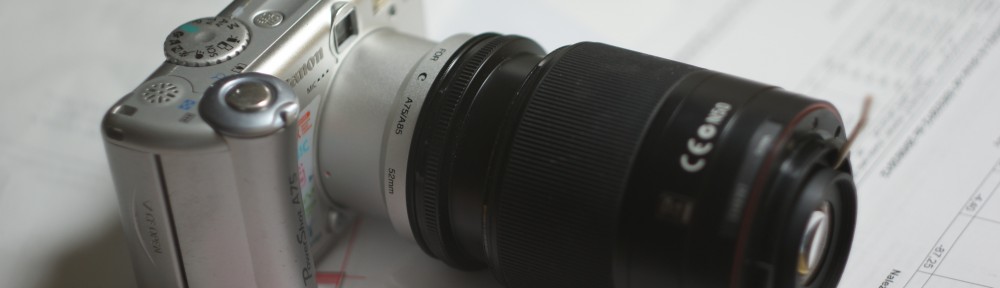
Ok, let’s get started and take some pictures. For the first shots I decided to try the reverse mount. This technique should give great quality pictures and magnification based on your lens focal length and your reverse-mounted lens focal length. The first one should be as long as possible (on my Sony a200 I use 300 mm Vivitar objective) and reverse-mounted should be as wide angle as possible (the widest I have is 18 mm from my stock a200 zoom objective). Using the adapter tube, reverse mount adapter and my a200 zoom locked at 18 mm I created the following set:

There’s a toothpick sticking from the objective locking its aperture at maximum (wide open). That gear is pretty heavy and you would not call it handy at all. Thanks to its mass it can be hold pretty still. How about the picture?

That’s not what you would expect from a DSLR… but you have to remember it’s only a compact camera with a small sensor, not APS-C. Its main lens is only 16 mm so it should not work well with reverse mount. Let’s just forget about that technique and move on. The vignetting is awful, the picture is distorted and the depth of field is very narrow.

Let’s bring out the big gun – Raynox MSN-505. One of the finest and affordable macro lens on the market. This little extension made this camera worth 5 times more than before.

Now you can see why I wanted to take pictures of ink on paper. The picture is very detailed and the distortion is not that bad. Depth of field seems acceptable. Here’s a crop from the above picture to show how good the quality is.

So, now you know how the paper is made and how does an ink looks like on it. Every single pigment. Tiny chromatic aberration… probably because of A75 objective, not the Raynox itself. Have in mind we did that with 3.2 megapixel compact camera.
Ok, what if we don’t want to use any adapters or extension but we just want our stock camera to do its macro shots. The following two pictures show the results with 3 times optical zoom and no zoom. Surprisingly, “no zoom” gives better closeup.
")
And “no zoom”:
")
That’s not much of a closeup but it’s better than nothing.
Ok, so we tried reverse mount and Raynox MSN-505. What else can we try with our adapters? We could add some close-up lenses before Raynox knowing that it should lower the quality but boost the magnification.
")
And the picture:

The magnification is not as big as we expected. We lost a lot of details, the depth of field is shallow and chromatic aberrations are way too big. Let’s crop the picture to take a closer look at the paper and ink structure.
")
If you are willing to accept that loss of quality this might be the best solution for you. Extreme closeup on Canon A75.